While following the instructions from the Brooklyn Brew Shop (that you can download from the right side of this page), keep the additional hints on this page in mind, they are based on actual experience and will greatly help you
Never hesitate to take copious notes every time you brew, that will greatly help you to get better at it
Also make sure to watch our video that sums all brewing steps up
We have a new and simpler procedure for the sparging step of this video further below
Sanitization
Sanitize every item that will get in contact with the wort for 2 minutes, including your stovetop (you may lay a spoon on it and then stir the mash with it)
You actually don’t need to worry about sanitization until end of boil, as bacterias are killed at this temperature anyway
No-rinse sanitizer US|CAN|UK takes about 15g per gallon of warm water
Mash
Turn off the heat when the mash reaches about 149°F (65°C), you likely won’t need to turn it back on for at least 30 minutes
Use a lid to give more momentum to the mash temperature
You can also wrap a blanket or plaid around and over the pot
Set an alarm or keep an eye on a timer, your mash will last about an hour
After an hour, “mash out” by rising temperature from 149°F (65°C) to 170°F (77°C), which takes more heat than you’d think, so turn to the max and stir while checking temperature
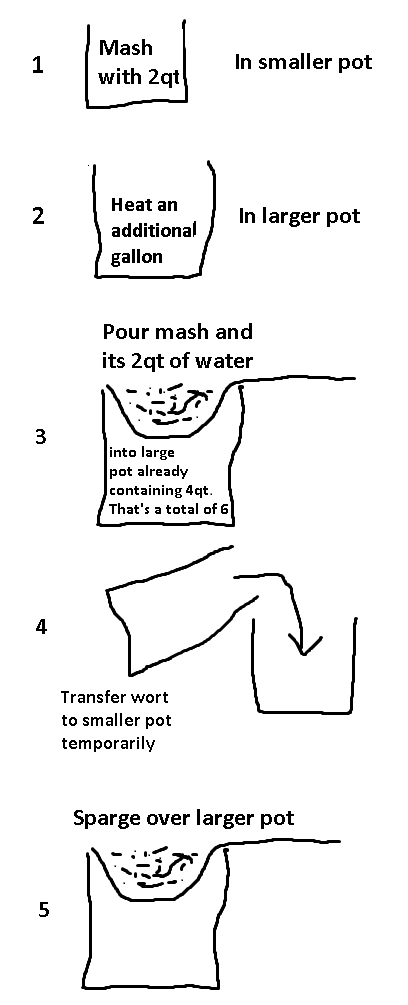
Sparge
Prepare two large pots, ideally at least one 8qt (10L) and one 6qt
Assuming that you mashed in the smaller pot (6qt), heat an additional gallon of water (or 5L in case of a 5 liters batch) in the larger pot (8qt) and pour the grain into the strainer placed on top of the larger 8qt pot (sounds complicated? See diagram below)
Temporarily transfer the wort back into the smaller pot and, finally, sparge above the 8qt pot where the boil will take place
There’s a new and simpler method further down
With time, I discovered a simpler way to sparge, that is also less messy and allows to extract more sugar
- Start by heating both the mash and sparge water (in a second pot) to 170°F (77°C)
- With a measuring cup US|CAN|UK take about 1qt (1 liter) off the pot containing the water
- Place the strainer on this pot and pour the grain in it
- Now, you can sparge with your quart/liter of water from the measuring cup onto the strainer
This way, you don’t need to recirculate the wort 2-3 times like the Brooklyn Brew Kit recommends and you get better sugar extraction results, because you sparge with clean water instead of wort
Note: the goal of sparging is to rinse the mash to extract as much fermentable sugars as possible
Therefore, when you recirculate your wort through the mash, try to avoid pouring it too directly, which would create channels and allow the wort to flow too directly through the grain
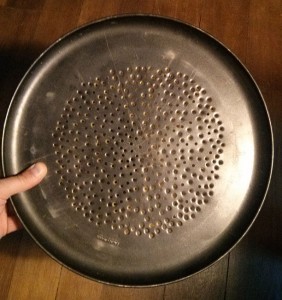
Instead, try to pour the wort gently and create an even rain everywhere on the strainer without disturbing the grain bed; you can achieve this by pouring the wort on a perforated spoon or a perforated metal plate

On the other hand, don’t squeeze the grain to try to extract more sugar, this could allow off-flavors to end up in your wort
If you are interested in making the whole sparging process even simpler (and better), you can try the BIAB (Brew-in-a-Bag) method
Boil
To ensure a decent boil, adjust heat for a “rolling boil” as in this video
Do not place a lid on top of the pot during the boil (but do during the mash), that would prevent off-flavors from being released
When the boil starts, add the hops that must boil for 60 minutes, then, using a timer such as your phone, set alarms to remember crucial steps, typically further hop additions, for example 30 minutes into boil for a second hop addition and 45 minutes for a last one
By the way, when adding the last bunch of hops, typically 15 minutes before the end of the boil, also take the opportunity to prepare the cooling bath with ice cubes and to sanitize the fermenter and funnel, so you won’t forget it
A good habit is to weight hops before starting the boil and keep them in small containers like paper cups, this way, you can just throw them when needed
Cool down wort
The risk of contamination is highest when the wort is still hot but not boiling anymore
Make sure nothing that was not properly sanitized gets in contact with the wort, including your hair that could fall into it
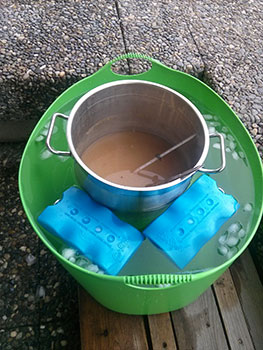
Cooling down wort in your kitchen sink as shown in the Brooklyn Brew Shop video is OK, but relatively little cold water will sit around the pot and it will get warm pretty quickly
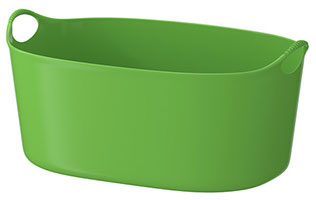
A larger plastic tank, about the size of a laundry basket (12″ x 20″ or 30 x 50 cm), is much better; this IKEA example (Torkis) is absolutely perfect for only 5 bucks
Fermentation
Make sure you properly sanitized both the fermenter and funnel and now pour the wort into the fermenter (you can dry the outside of the pot with a kitchen cloth to avoid contamination from bath water)
Remove solid sediments from the funnel mesh every time it gets clogged
Place the stopper on top of the fermenter when you shake it, that makes wort aeration easier and safer than blocking the fermenter mouth with your palm, you just need your thumb
Make sure to let fresh air get into the fermenter from time to time for better oxygenation
For more security, you can place a finger in the fermenter handle while shaking
Priming and bottling
If you opt for an auto-siphon (highly recommended) US|CAN|UK rather than a racking cane, keep its mouth under the surface but away from the bottom of the fermenter to avoid pumping trub
If you end up with the last bottle half empty, take some beer from all your other bottles to even that up
When you are done with priming and bottling, make sure to clean your equipment as soon as possible before things get dry
Enjoy!
When serving your beer, don’t let the deposit at the bottom end up in your glass
Even if you’ve seen hundreds of waiters stirring the last drops with a snobbish connoisseur look, this is wrong, yeasts do not belong your beer
Make sure to store your bottles upright and pour them in one steady motion, keeping an eye on the deposit and leaving it in the bottle.
A good way to solidify the “lees” at the bottom of the bottle and prevent them from flowing to your beer is to refrigerate your bottles 24h before serving, which also helps to reabsorb and even the carbonation for tighter bubbles that last longer in the glass
Before you brew
Make sure to read our questions How to brew one gallon beer batches before you start
We strongly advise that you also read the first section of the best book on homebrewing

At least to better understand what’s going on and what you should be particularly aware of
Brewer
Latest posts by Brewer (see all)
- 1-gallon Plastic Beer Fermenter - 03/10/2017
- Create beer bottle labels - 26/01/2016
- Grow your own hops - 30/03/2015
BBS should link to your video. Sooooooo much better. Thanks.
So glad I found your site and thanks for all the instruction. I brewed yesterday and have my gallon fermenter in a cooler filled with a little water. Temperature of water is constant 60-62. It does appear that yeast is less active after on 18 hrs. or so. Is this normal?
Thanks,
Chris Blythe
60-62°F (16-17°C) is a bit cold, which explains the relatively quiet fermentation, but it should give an excellent beer as low temperatures are better.
This said, I would shoot more for 64°F (18°C) for your next brews
Great, thanks again!
How do you separate and weigh the yeast package cleanly? I buying a dry yeast package for 5 gallon brew and have read you use 2 g of dry yeast for 1 gallon. Does the container that you weigh it in have to sanitized? Thanks for this website. It has helped a lot.
Hi,
I use one of these very precise scales. You need a quarter pack for 1-gallon/5 liters, that’s 3g.
I don’t weight it in a container, I weight it in the negative range, that is, I place the open pack on the scale, I reset the weight by pressing Tare and from then on, I gently pitch some yeast directly from the pack to the fermenter and put it back onto the scale until I reach -3g.
If I’m using a bucket instead of a glass carboy, can I just follow the instructions from Brooklyn Brew Shop? Someone told me that I don’t need to filter out moving the wort because the sediment will just sink to the bottom during fermentation, does it make any difference what’s done at that stage?
Hi Dom,
You can use any fermenter as long as it’s about 20% larger than your batch size (if it’s twice the size, that’s fine too).
Yes, the yeast and hops will sediment at the bottom of any fermenter, this does not make any difference. I personally like to filter the wort, because I don’t want my hops to sit in the fermenter, but that’s just a personal preference. Brewers generally care about reproductibility (= being able to reproduce a beer), so as long as you keep track of how you do things, that’s the most important thing.
Have you tried wild beer using foraged yeast?
Funny that you ask as I’m currently reading about this in the excellent Homebrew Beyond the Basics
On pages 137-8, it explains how to harvest wild yeast from the air and brew with it.
Very interesting, I may try it sometime.
As a suggestion, I would definitely put the (disinfected) lid on the pot when cooling the wort down. It takes about 20 to 30 minutes to cool the wort from boiling temp to yeast pitching temp (around 20°C/68°F), in which time lots of nasties could contaminate the young beer.
That is, unless you’d want to try out wild yeast fermentation as per your last comment…
Good idea, but I personally prefer to swirl the wort with a paddle to speed up the chill, speed is key here for a dense and creamy head.